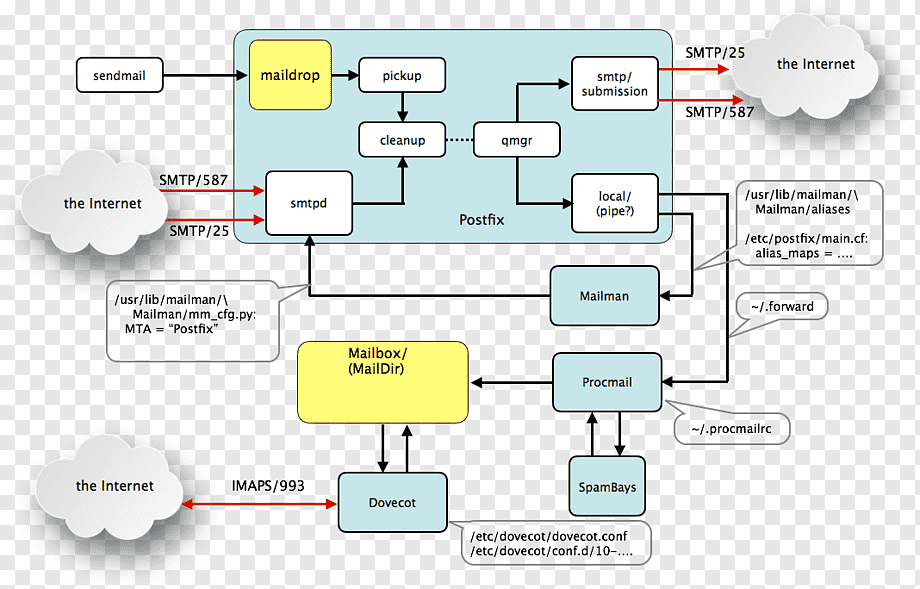
Postfix
Blacklist & Whitelist with Postfix
1. Create a file of IPs to blacklist - Postfix Reference
Create a reject.cidr file in /etc/postfix. To it, add one or more problematic IPs or ranges from your logwatch reports, mail logs, email headers, etc.:
192.168.1.1     OK
192.168.0.0/16	REJECT
2001:db8::1		OK
2001:db8::/32	REJECT
FROM THE DOCS - Rule order matters! Place specific whitelist entries before general blacklist entries.
2. Hash the reject.cidr file - Postfix Reference
The reject.cidr file must be converted to a database that Postfix can read. This must be done every time reject.cidr is updated.
postmap /etc/postfix/reject.cidr
3. Update /etc/postfix/main.cf - Postfix Reference
Postfix needs to be made aware of the new IP blacklist. To alert Postfix of the blacklist, you’ll need to add the following to main.cf. - Postfix Reference
smtpd_recipient_restrictions =
   check_client_access cidr:/etc/postfix/reject.cidr
FROM THE DOCS - Placing a block list at the beginning of the smtpd_recipient_restrictions parameter ensures that the IP blocks are obeyed above all other processing, but just as importantly, prevents more-expensive operations, such as virus scanning and spam scoring, from running when the outcome is predetermined.
4. Reload the Postfix configuration
Execute the following command
/etc/init.d/postfix reload
5. Check the Postfix log
Check mail.log to confirm that there weren’t any errors reading the new configuration. The following command should be sufficient in most cases.
tail -n 20 /var/log/mail.log
Taking it Further
There are two parameters we can set in postfix, which acts differently.
check_client_access: Block by client IP, client IP range or Hostnamecheck_sender_access: Block by sender e-mail address (FROM field)